WPF App with VC# Code in Visual Studio 2017
How to build a WPF application with VC# code to control its behavior in Visual Studio 2017?
✍: FYIcenter.com
![]() After you have created your WPF application with XAML to define its UI elements,
you can follow this tutorial to add VB code to control its behavior in Visual Studio 2017:
After you have created your WPF application with XAML to define its UI elements,
you can follow this tutorial to add VB code to control its behavior in Visual Studio 2017:
1. Create a "WPF App (.NET Framework) project as shown in the previous tutorial.
2. Enter the following project name and location:
Name: ClickMeWpfVcs
Location: c:\fyicenter\vcs2017
Solution name: ClickMeWpfVcs
3. Click "OK". You see a default application window displayed on the visual design section showing up.
4. Open the MainWindow.xaml file and enter the following:
<Window
    xmlns="http://schemas.microsoft.com/winfx/2006/xaml/presentation"
  xmlns:x="http://schemas.microsoft.com/winfx/2006/xaml"
    x:Class="fyi.MyWindow"
    Title="ClickMe WPF VC#"
    Width="200" Height="200">
  <Button Click="myClick" Width="90" Height="30">Click Me!</Button>
</Window>
5. Open the MainWindow.xaml.cs file and enter the following:
using System.Windows;
namespace fyi {
    public partial class MyWindow : Window {
        public MyWindow() {
            InitializeComponent();
        }
        private void myClick(object sender, RoutedEventArgs e) {
            MessageBox.Show("Hello World!");
        }
    }
}
9. Click "Build > Build Solution" menu. The application should be compiled with no error.
10. Click "Debug > Start Debugging" menu. Your application will run.
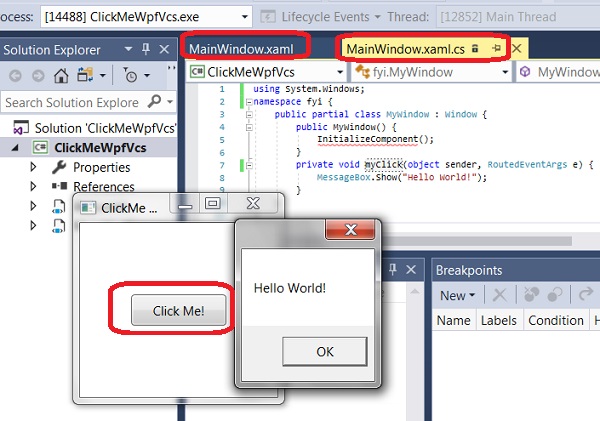
11. Click the "Click Me!" button, the message is displayed.
The picture below shows you how to build and test a WPF application with XAML and VC# code in Visual Studio 2017:
⇒ Release Build of VC# Code in Visual Studio 2017
⇐ WPF App with VC# and XAML in Visual Studio 2017
2017-08-08, ∼2752🔥, 0💬
Related Topics: